Instructions for Conversion
of Motorola UHF MICOR® to a Repeater
This page was personally approved by James L. Reese
for internet publishing here at repeater-builder.com
NOTE: This now includes
all figures and tables scanned from Jim Reese's information packet.
Original modification by: James L.
Reese, WD5IYT
March 25, 1996
Updated February 15, 1999 by: Phil
Salas, AD5X
Phil's updates include better printing figures and text additions to
make the conversion easier. Included also are tuning procedures and details
on the construction of a tuning meter.
This modification is for the 450-470 MHz MICOR® radio. This
frequency band radio has a 16.7 MHz offset oscillator permitting a 5 MHz
transmit offset. In order to use a 406-420 MHz or 470-512 MHz MICOR®
radio, you will need to change the crystal in the offset oscillator to
16.7 MHz for proper amateur repeater offset.
Read through this entire procedure before beginning.
This modification is not for the faint-hearted. Be sure you are
very comfortable with the operation of the MICOR® radio before you
attempt this modification. A thorough understanding of the way the
MICOR® radio and control system works is absolutely essential for the
success of this conversion.
Modification Notes:
This modification was intended to be used with radios serving the Armadillo
Intertie System. Whenever "Molex Pin x" is mentioned, it refers to the
Armadillo Standard connector. This is a small, 9 pin Molex connector which
serves as the interface for all of the Armadillo System radios. Use a Female
connector on the radio end. When using this modification for individual
use, the pin out can be disregarded. The standard pin out of the connector
is:
1 - Ground
2 - Receive Audio Output
3 - n/c
4 - Transmit Audio Input
5 - COS Output
6 - PTT Input
7 - n/c
8 - PL Decoder Output (Sense)
9 - PL Select Input
The COS output and PTT input are open collector to ground signals.
Pin 8 goes to +9.6 V when PL is decoded. Pin 9 is ground for PL,
open for Carrier.
These modifications allow "PL and Squelch" operation. This means
that when in PL, the normal squelch circuit still operates. This
avoids long noise bursts upon unkeying.
If using an Advanced Computer Controls controller, the signal at pin
8 is run to the "PL Sense input" on the controller. It will drive
this input directly.
Order the crystal after determining the crystal frequency as follows
by reading this information:
The MICOR UHF Mobile.
Disable the receiver AFC by jumping the printed circuit pad under the
"AFC-off" hole on the RF/IF cover to ground. Why? Two reasons. First,
the UHF mobile MICOR® uses one channel element (receive), and the transmit
frequency is also determined by it, For normal low-side injection, a user
that is off frequency will be pulled on frequency by the electronic warping
of the channel element, thus pushing the transmitter off frequency by that
same amount. And second, if the receiver is operating with the local
oscillator injection on the high side, the phase of the receiver discriminator
is 180 degrees out, so a user that is off frequency is pushed even further
off frequency.
For more information on understanding the concept of the MICOR®
receiver go to The Motorola® MICOR® "Sensitron"
High Band Receiver Even though this information was written for
the high band MICOR receiver, a lot of the information is pertinent.
List of Tables and Illustrations:
There are several illustrations which are detailed below. Refer
to them as needed when modifying or constructing pieces of this project.
Table 1: This is a complete hookup chart
for the control head plug and interface board.
Figure 1: Schematic of control head plug, with simple diagram.
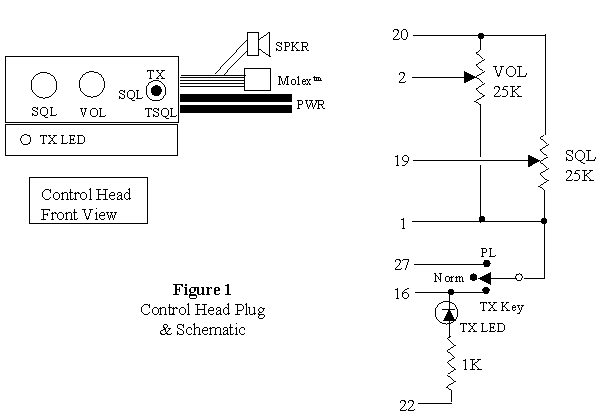
Figure 2: Board Layout of audio squelch board detailing added capacitors.
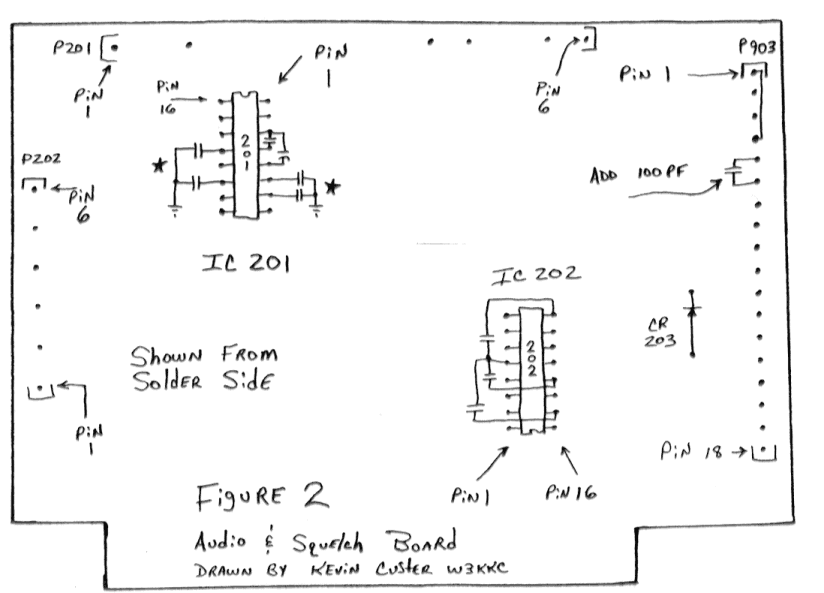
Figure 3A: Detail of circulator unit showing location of major components before modification.
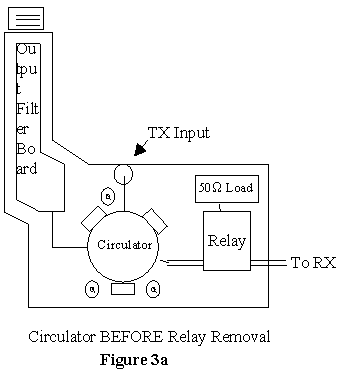
Figure 3B: Detail of circulator unit showing location of major components after modification.

Figure 4: Schematic of circulator unit before modification. Click on it for a larger image.
Figure 5: Schematic of circulator unit after modification. Click on it for a larger image.

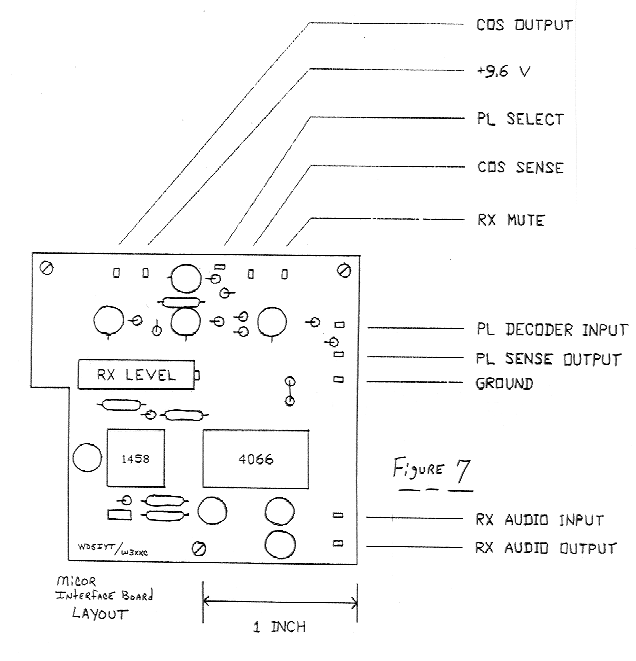
Figure 6: Schematic of interface board. Click on it for a larger image.

Fgure 7: Rough layout of interface board.
Useful Motorola Part Numbers:
6881015E70-H Manual for UHF MICOR®
KXN-1024 5ppm Channel Element for UHF MICOR®
KXN-1029 2ppm Channel Element for UHF MICOR®
KLN-6210A PL Encode Reed
TLN-8381A PL Decode Reed
0184307A89 Empty Control Head Plug less cable, complete with pins
6684690C01 Contact Removal Tool for MICOR® plugs
TKN-6458A Large Fuse Holder for Primary Power (40A)
Step-By-Step Instructions for
Modification:
Step 1: Make sure that the radio operates properly BEFORE any
modifications are done. If there are problems with the radio, they
will be easier to fix before the mods are done.
Step 2: If you are satisfied with the operation of the radio,
construct the control head plug per the figure below
and table 1. Use miniature pots and switches
inside the control head plug. It is rather tight inside, so be careful
to check that the connector will re-assemble before you drill it up.
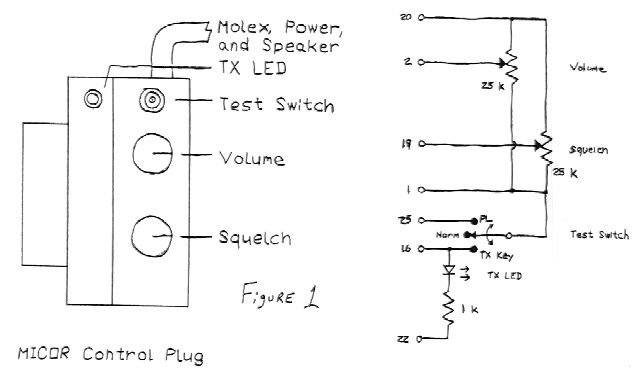
Most control heads do not have the full complement of pins installed.
Therefore, formerly used pins 12, 13, and 14 are employed. Pin 12
apparently is never used but is wired to a small relay near where your
interface board (built later) will go. Cut this wire loose from the
relay and add a 6" wire extension to it. Pin 13 is the F3 select
line and goes to the junction of CR903/CR907 on the control board.
Pin 14 is the F2 select line and goes to the junction of CR902/CR906 on
the control board. Remove these four diodes and attach short wires
(6") to these junction points to connect to the interface board you will
build later. Finally, permanently enable the F1 channel element by adding
JU909 on the control board (wire from junction of CR901 and CR905 to ground).
Also, ensure that JU1 is in place on the control board, as this enables
the offset oscillator.
After you have constructed the connector, make the following connections
inside the radio:
Jump control head pins 3, 8, and 22 to "A+" on the control board.
Jump pins 9, 11, and 17 to ground on the control board. Next locate
the two feedthrough caps which power the Transmitter Power Amplifier.
They are just to the left of the control head plug on the bottom side of
the radio. One will have a red wire, and the other a black wire.
Jump from the feedthrough with the red wire to the "A+" trace on the control
board. Jump from the feedthrough with the black wire to the ground
trace on the control board. There is a reverse polarity protection diode
on the control board which can be used to make these connections.
Next, plug your control head plug into the radio and verify proper operation
with the new control arrangement. If there are problems here, troubleshoot
them NOW. Do not wait until later, as you may be chasing more
than one problem.
Step 3: You must make some modifications to the control board
and the receiver audio/squelch board in order to make the radio full duplex
and to make preparations for the interface board. First, remove JU-905
on the control board. Then, jump the F1 channel element to ground
as described in the Motorola manual. Next, jump pins 1 and 4 of the
audio squelch board. On the later version audio squelch board, there
is a place for a jumper (JU-202), on earlier units, just make the jump
with wire wrap wire. Next, remove a jumper on the audio squelch board
which goes from pin 3 of the PL decoder to IC-202 pin 8. This is near the
pins which the PL board plugs into. Next, ring from pin 3 of the
PL decoder to pin 11 of the audio squelch board with an ohmmeter.
There should be continuity here. If not, add a jumper. The
later boards have a trace from pin 3 of PL to pin 11 of audio squelch,
on earlier boards, pin 11 is unused, and you should jump from PL decoder
3 to audio squelch 11 with some wire wrap wire. Add 15 pF capacitors
between the following pins on the two chips on the audio squelch board.
Figure 2 details the location of these caps. On IC-201, add a cap
between pin 3 and 4, and between pin 3 and 5. On IC-202, add caps
between 5 and 9, 5 and 13, and two caps between 5 and 15. This makes the
board less susceptible to RF. You may want to refer to this mod page
"MICOR®
mobile "audio & squelch board." However, DO NOT cut the
circuit trace leading from IC 202 pin 11 as called out in this mod! Finally,
it is a good idea to raise the input impedance of audio input to the MICOR®
exciter. This is done by removing R301 (R439 on some models), a 270
ohm resistor on the UHF exciter board. Or just cut the trace between
R300 and R303 on the exciter board.
Step 4: Next, carefully remove the front casting from the chassis.
This is done by removing the four screws top and bottom as well as two
screws on the control head plug. This is kind of tricky, so be careful
to remember how you got it apart so you can re-assemble it later.
Especially pay attention to the way the front connector is held in place
with the two plastic pieces that the screws go through. Next, examine the
Power Amplifier section of the radio and notice the miniature connector
which connects the output of the PA to the circulator. Unplug this
connector from the circulator using a needle nose pliers or hemostat.
Next, turn over the radio and remove the power control board. This
will expose the top plate of the circulator. Remove the circulator
by carefully removing the sensing wires which connect to the power control
board and the two screws which hold the circulator in. You will have
to unplug the receive antenna coax from the preselector unit in order to
remove the circulator. Set the circulator aside for later modification.
Step 5: Procure either an SO-239 or a BNC chassis mount connector
for a receive antenna jack. If a SO-239 is used, make certain to use a
hood on the back of the connector to totally shield the socket. Mount this
connector on the top side of the front casting on the side opposite from
where the lock is located. Be very careful to locate this connector
so that it does not hinder the operation of the latch mechanism.
Attach a small coax to this connector and route it to the receive antenna
jack on the preselector unit. Drill a hole in the front of the radio
chassis to pass the coax. This will be obvious once you have examined
the unit with the front casting removed. The jack on the preselector unit
takes an RCA plug with a short pin. Examine the plug on the original
cable and cut off the pin on your new RCA plug to match.
Step 5: If your radio will be receiving below 445 MHz, change
C117 to 27 pF, C119 to 39 pF, and C125 to 12 pF on the receiver
board. This is not necessary if the radio will be receiving above
445 MHz.
Step 6: This is the toughest part of the conversion, the circulator
modification. Figures 3, 4, and 5 detail the conversions. Remove
the cover from the circulator unit. You will notice that there is
a circulator, an output filter, the antenna switch, and the circulator
reject load. There are three trimmer caps, only one of which has
an access hole in the top plate. Measure and drill the top cover
so that you have access to all three trimmers from the outside. This
is necessary because the cover affects the tuning of the circulator.
After drilling the cover, set it aside. You must now remove the antenna
relay. This is a small relay on the right side of the circulator.
The small dark red rectangular unit with a wire coming from the relay is
the reject load for the circulator. The relay switches the output
port of the circulator between the receiver and the reject load.
You must remove the relay and wire the dummy load back to the output port
of the circulator which is on the common side of the relay. Refer
to the diagram for the circuit. The easiest way to accomplish this is with
a small piece of teflon coax (RG-188). Run from the circulator port
to the reject load. You can solder to the circulator case for the
shield on the load end of the coax. Replace the cover on the circulator
and reinstall it in the radio.
Step 7: Construct the interface board using the interface schematic
and board layout links above. Install this board on the three unused
mounting tabs near the rear center of the radio. These tabs are above
the control board. Wire the board up as described in table 1.
At this point, the radio will be operating full duplex, and you should
be able to put the radio in PL by flipping the switch on the control head
plug to the PL position. Verify that you have +9.6 volts at the 9
pin molex connector PL SENSE pin when the correct PL code is being sent.
Also verify correct receive audio gating and COS action.
Tune Up Instructions:
Tune the radio per the Motorola manual (ADJUSTMENTS Chapter 6).
The receiver adjustments are in Section 5, the Offset Oscillator adjustments
are in Section 6, and the Exciter adjustments are in Section 8 of this
chapter.
For the receiver alignment, you can use a talkie at its lowest power
setting with a 20 dB attenuator for the initial front-end adjustments.
You can purchase 20 dB type-F attenuators from Marlin P. Jones (P.N. 5049-TV)
for $2 each (800-652-6733) as well as F-to-BNC adapters. However,
as the receiver tune-up proceeds, you will be unable to get a low enough
level signal even with additional attenuators due to radiation from the
talkie, cables, attenuators, etc. The 3rd harmonic of a low power
2-meter rig with 20 dB attenuators, or a 140-150 MHz signal generator with
20 dB attenuators works well. The 3rd harmonic of an MFJ-259 running
from an external 12V supply that has been left to stabilize for at least
10 minutes makes a good signal generator for this (again, with as many
20 dB attenuators as necessary). Put all the attenuators on the signal
generator.
In Exciter adjustment procedures steps 5 and 7, change CW to CCW and
CCW to CW for repeaters where the transmitter is offset 5 MHz low
in frequency.
Now, key the transmitter and adjust the trimmer capacitor in the channel
element for the correct transmit frequency. Make sure the offset
oscillator adjustment has been done first, or your receiver may be off
frequency!
Once you have tuned up the radio, you need to tune the circulator.
The following procedure should be followed:
Step 1: Remove the power control board, and power the radio with
a supply having a current meter.
Step 2: Attach a jumper or clip lead from feedthrough C527 on
the Controlled Stage in the PA compartment and feedthrough C536 on the
driver stage in the PA compartment. This will force the radio to
maximum power output.
Step 3: Key the transmitter and tune the three circulator capacitors
for maximum power output.
Step 4: Reinstall the power control board, and preset the drive
limit pot fully counter-clockwise. Set the power set pot to the desired
power output level. I recommend no more than 50W out for a 75W radio,
and no more than 60W out for a 100W radio. The 25 and 45W radios
are rated continuous duty at 25W output.
Step 5: Key the transmitter and tune the center circulator capacitor
(the only one accessible from the top of the power control board) for minimum
current draw. You should be able to make several Amps difference
without affecting the power output.
Step 6: Turn the drive limit pot 1/4 turn clockwise.
That's it. you are now ready for major repeating action.
Remember to always set the receive frequency first when setting frequency,
as this affects the transmitter also. Set the transmitter with the
offset trimmer coil on the exciter board. Make sure that you have
adequate forced air cooling on the PA at all times during operation.
The MICOR® PA is not easy to fix, and when it blows, it blows big.
This page prepared by: Kevin K. Custer W3KKC
Back to Home