Back to Home
By Thomas M. Mayse, KN5S
HTML'd and edited by Mike Morris WA6ILQ

|
Up one level Back to Home |
Channel Upgrades to the GM300 Radio By Thomas M. Mayse, KN5S HTML'd and edited by Mike Morris WA6ILQ |
|
A remote-mount GM300 showing the results of this article
Basic Requirements
This procedure is for the purpose of adding more channels / modes to the GM300 radio.
Although we may be able to increase the mode count from 8 or 16 to 23, 32 or all the way to 40, the radio will still only scan up to 16 modes.
Additionally, the modes in the scan list must be within the first 16 channels - unfortunately we can't spread them around and select them as we can with Spectras.
This procedure assumes that the reader has worked with Motorola RSS before and has the PC or laptop capable of running this older slower DOS based software. For more information on RSS and the RIB see the other pages on this topic at this web site.
However, some essential tutorials are included just in case.
The author runs an old mint condition Toshiba T2105 Satellite 'wood burner' laptop for all DOS based applications.
You will need a RIB and appropriate cables. The author uses an aftermarket RIB that can use a standard ethernet patch cord to connect the RIB to any of the Maxtrac/Radius/GM300 family radios.
You will need the HVN8177 Motorola Radio Service Software loaded on your RSS PC. I am using the final version (R5.00.00), and I tested this procedure on version 4 and it works there as well.
Models Covered:
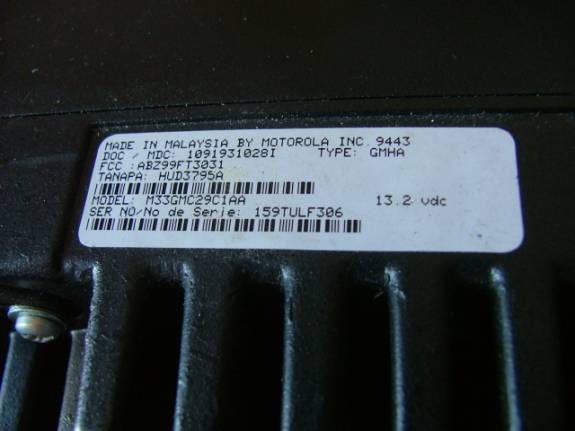
A typical Gm300 model number is M33GMC29C1AA. Note the three-letter sequence in
the middle of the model number, in this case GMC. This modification will work
with GM300s that have the sequence "GMC", "GMK" and
"GMR". The GR300, GR400 and GR500 repeaters used GM300 radios in
their stock configuration, but these repeater cabinets have been seen with
every possible combination of radios that have 16-pin accessory connectors.
The most common are M10, M120, M130, Radius, MaxTrac 300 and GM300.
The hex-editing procedure described in this writeup can be applied to other
products, i.e. MaxTracs and GTXs. In fact, the GTX MDF file can be similarly
edited to raise the number of conventional modes up to 15.
See these articles:
www.repeater-builder.com/motorola/maxtrac/maxtrac-chan-upg.htmlYes there is some duplication of information in the above files, but that is inevitable when you have multiple people writing articles on the same topic. It's still worth reading all of them.
www.repeater-builder.com/motorola/spectra/spectra-rss-hex-edit.html
www.repeater-builder.com/motorola/gtx/mdf-secrets.html
www.repeater-builder.com/motorola/rss/rss-hex-editing.html
www.repeater-builder.com/motorola/rss/maxtrac-900-hex-editing.html
An emailed comment from an experienced bench tech:
If you are modifying a radio to get more channels, and the desired
channel count matches an official model number, it's better to change
the model number in the radio than to patch the channel count in the RSS.
First, the fewer mods you make to the RSS the better. Changing the model number in the radio requires NO modifications to the RSS.
For example, a D44MJA77A3 is a 6 channel Maxtrac without scan (yes, I know this is a GM300 article, but the MaxTrac book was open on the bench and I'd have to go looking for the GM300 book). A D44MJA9DA5 is a 32 channel version with scan. Assuming the radio hardware supports the desired features then changing a model number in the radio to one that has the features you want is much safer than adding features to a minimal model number.
Second, if someone has, for example, an 8 channel radio, and their copy of RSS has been patched to allow that 8 channel model number to have 16 channels, and then someone with a unmodified RSS makes any change - even something as simple as changing a PL tone, the unmodified RSS will either error out or it will truncate the channel count to 16 channels during the uploading process. After all, the RSS thinks that radio is an 8 channel radio, and that's all the radio gets. The only way to get your 16 channels back it to get the radio back to the modified RSS and upload the 16 channel codeplug, then fix the PL tone. One indication of a codeplug versus RSS issue is Error 58.
On the other hand, if the radio identified itself to the RSS as a 16 channel radio the stock RSS happily makes the change and updates the radio. So look at the RSS with HexEdit and see what model numbers it supports, then check the model tables in the sevice manual for the channel count. When you find a model number with the maxed out channels, and all the options you want (like scan), tell the radio that this is the correct model number.
The .MDF File
The RSS file that defines how many channels a particular GM300 model has is called the GM300.mdf file or Model Definition File.
It is here that all the applicable radio model numbers are archived, with some functional characteristics on each model defined in code.
What we need to know is the model number of the radio as seen on the model number label usually located on the bottom rear of the radio, in front of the heat sink.
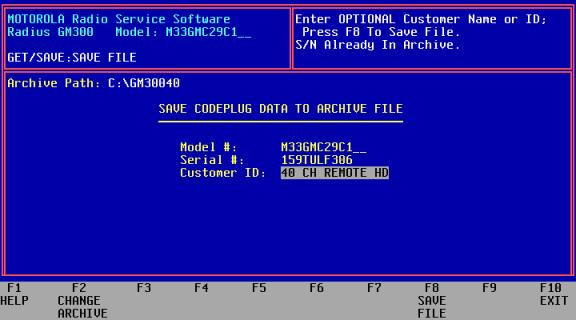
Here's the data label on the GM300 used in our tutorial:
If your radio label is not readable:
As long as you can hook up the radio to your PC and do a read codeplug, you can get the model number on a read radio and save file action:
First, F2 READ Radio
Note that The radio model ident appears as seen in the image above in the upper left header area.
Second, F7 SAVE the Archive File
NOTE: An exception here could be if somone made an EPROM replacement and then entered a different model number during reinitialization, but it still should work here.
At this point, we need to find and edit the .mdf file on a regular PC with a hex code editing suite.
I use Hex Workshop by BPSoft. This product contains a hex / decimal calculator and a base converter.
My Hex Workshop settings:
This PC should have a diskette drive or other media conversion utility to get modded code over to the DOS machine.
Open Windows explorer or File Manager and locate where your GM300 file is.
Find GM300.mdf
Open HexEdit , file open / look in, and display the .mdf file.
You should then have something like this displayed:

Now we need to know the checksum of the entire MDF file before any editing is done.
The Motorola software does a checksum test at boot and if there is a difference from what the MDF file 'knows' to be the correct value, we will get a corrupted codeplug error message, and no further progress until fixing the checksum.
Do a generate checksum-16, entire file.
You will see a screen like this after checksum generate is done:
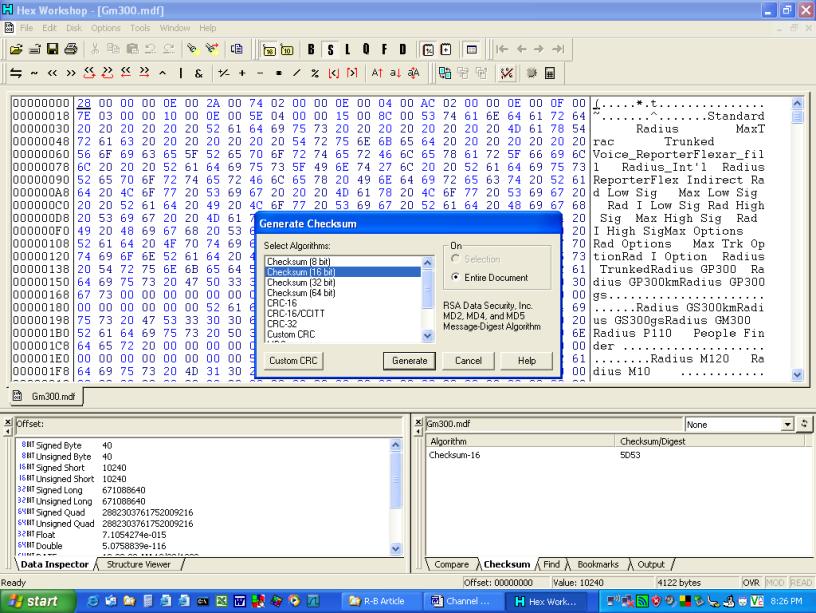
This one gave us a hex value of 5D53h. (look in the lower right box)
This is the target value we need to maintain in order to get
the edited version to pass the initial checksum test in RSS startup.
Write it down if you have to.
NOTE: This original GM300.mdf should be saved in another file until the new edit is proven out, in case of a need to restore things to original state. One possibility it to create a duplicate copy as GM300MDF.OLD before you HexEdit it.
After overwriting (editing) the 5th byte for the new channel count, we will do another generate checksum and see how much re-editing we have to do to get our original value of 5D53h back.
We will do this at the bottom of the document so as to avoid the model definition file content area.
In this example we are looking for an M33GMC29C1AA.
It is at offset 000007F8.
In the right pane highlight the first 10 characters of the base model number. Click and drag to highlight the model number M33GMC29C1. Only highlight the first 10 characters (so the mode location where to look stays fixed for this procedure.)
Here is what we have after finding and highlighting our model number.
Notice the 5th byte: it is 10h, or 16 modes.

To view hex code by single bytes:
In Hex Editor
Go to Options>Preferences>Layout> Group By and select 1 byte view.
At this point we are interested in the 5th byte after
the highlighted model number code.
This is the channel / mode count limit for that model.
In this shot we see a value of 10h, corresponding to 16 channels.
Here is where we edit how many modes to put into the radio, with some "howevers."
For one, it may not be possible to blow a 8 mode radio all the way out to 40 modes.
So far, I have taken 16 mode radios out to 40.
The numbers to shoot for are up to you, but I try 40 first.
If the radio doesn't like it, you will not be able to enter the
modes past the EPROM's memory limit.
This is encountered in the RSS once you have the edited .mdf in
and try to increase / add modes in the mode utility... the radio will
go "boink" and you'll have to start new, backing out the
edit and either going to 32 modes, 23 or edit the model number.
For this reason, I target 23, 32 and 40 modes as benchmarks after some trial and error.
The Code Edit
Overwrite the 10h on the 5th byte to 28h, changing the mode count for that model number from 16 to 40 modes.
Now, the value of 10 is now 28.
16 just went to 40 modes.
At this point we could edit any of the other model numbers in the RSS
using the same method.
Once all the edits are done we need to save the modified file while preserving the original .mdf file in case of any problems later.
Until you verify the channel count change in an actual radio, it is wise to save the edited file somewhere else OR make an experimental GM300 file altogether and keep the original separate.
Anyway, now we have a 40 channel model M33GMC29C1 modded .mdf with a faulty checksum.
Let's see what it is and why the program will fault if we ran it now:
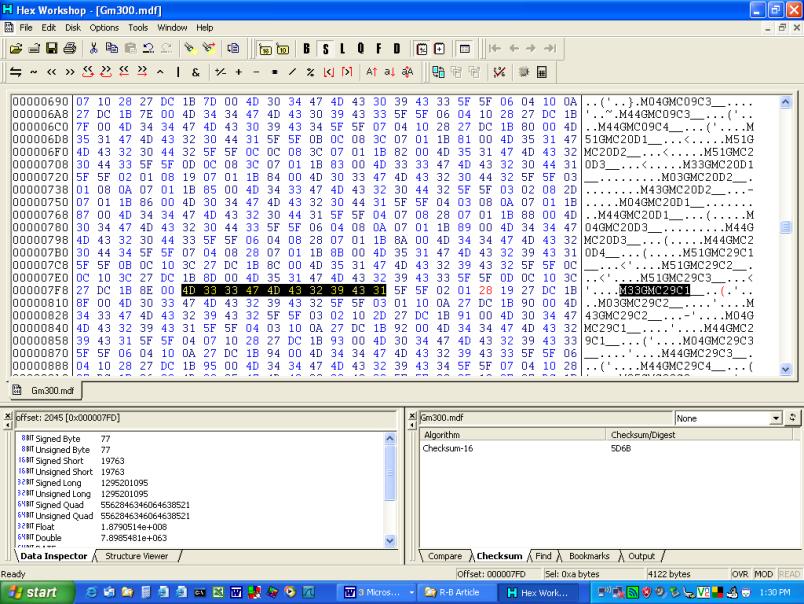
Our checksum of 5D53h went away. The new value is 5D6Bh.
Our edit is in red until we save the file.
Hex Edit tells you this much also in the lower right corner
(next to OVR and MOD).
Now we need to correct the checksum to get our 5D53h back.
Scroll to the end of the file in HexEdit.
Here will be the copyright info area.
This is where we will insert and delete characters until we arrive at the
original value.
Note from Robert W. Meister WA1MIK:
Not all MDF files contain a copyright notice in them, so users don't
always have the opportunity to change that message and must look elsewhere.
You could also change some bytes in other model number entries, especially
if the RSS supports 800 MHz radios.
Also, the last 6 characters of the MDF seem to be a revision or other important value; these should NOT be altered.
The author's GM300.mdf file sports two 800 MHz models: M45GMC29C0 and M35GMC29C0.
Finding The Edit Location
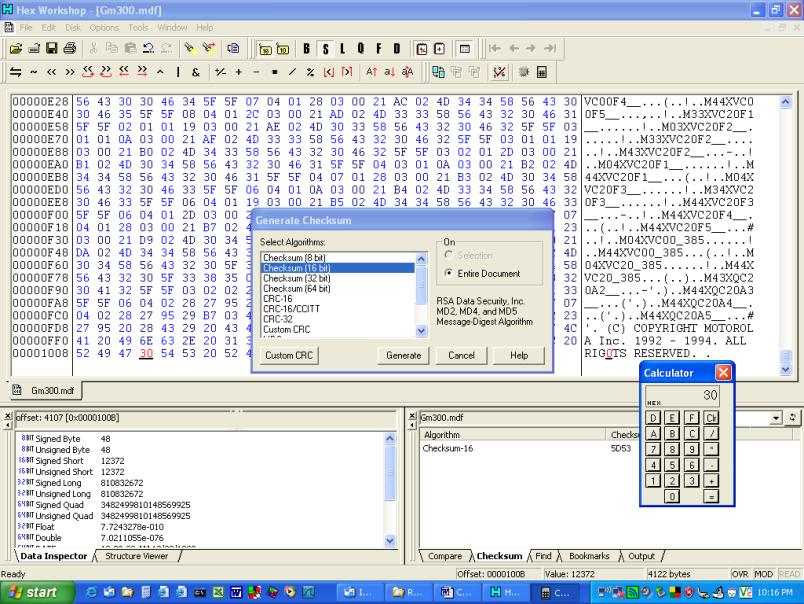
When you change that "number of modes" byte from 10h (16-decimal) to 28h (40-decimal), the checksum increased by 18h (hex). To fix it, all you have to do is LOWER some other byte by the same amount.
For our "some other byte" location, we will use the copyright notice area located at the end of the MDF file.
What we would like to see is a byte with a value larger than 18h to subtract 18h from.
An easy one: there's an "H" in the copyright notice at the end of the file; it's hex value is 48. If you lower it by 18 (hex)to 30, it becomes the digit zero (0), and you've just corrected the checksum.
Any way you can lower the checksum by 18 (hex) will fix it.
Screen shot showing the use of the Hex Calculator to
determine what value in hex we need to make the edit of
the 48h at offset 0000100B.
We started with 10h (16 decimal) and raised it to 28h (40 decimal).
The difference in hex is 18h.
48h - 18h equals 30h, so we edit the 48h here to a 30h as shown
and generate another checksum of entire MDF file to verify that
we have restored our target original checksum value of 5D53.
Now with the checksum fixed, we can insert this edited MDF file into the GM300 directory so we can run the software and edit the radio codeplug.
In my case, I saved this edited .mdf onto a diskette for the Toshiba laptop.
Go to the file where your GM300 program is and insert the new .mdf file in.
Working in DOS
A little rusty on DOS commands?
Here is a good web resource for help on DOS:
http://www.computerhope.com/dostop10.htm
This brief tutorial assumes the following:
1. You have placed the edited .mdf file on a diskette.
2. That's the only file on it so as not to complicate the operation.
3. It is the A: drive on your machine.
4. The HDD containing the GM300 directory is drive C:
Adjust accordingly if this is not the case, of course.
At C :\
cd \ (the drive you have the GM300 in)
Example:
C:\cd\GM300 (enter)
C:\GM300
A: (enter)
A:\_ (the A:\ prompt)
A:\ copy *.* C: (enter)
A:\_ (the A:\ prompt)
gm300.mdf
1 files copied
A:\_ (the A:\ prompt)
C: (enter)
C:\GM300
C:\dir/w (enter)
At this point you should see all the files in the GM300 directory, including GM300.mdf
If it's in there, fine. Type GM300.exe and enter.
C:\GM300
GM300.exe (enter)
GM300 MRSS should start.
Operation in the GM300 RSS:
F3 GET / SAVE Codeplug Data
OR
F2 READ Radio
AND
F7 SAVE Archive File
Use OR Abort F10 Backup Diskette
THEN
F10 EXIT / Return To MAIN Menu
F4 CHANGE/VIEW Codeplug Data
F3 PREVIOUS MODE
This is the top mode in it now.
F8 MODE UTILITY
Up down arrow until ADD MODE displays.
THEN
F8 EXECUTE
On a 16 channel radio, the "insert after" should increment to 017
After all new channels desired are entered, then
F10 EXIT
F3 or F4 to see the new channels and enter freq and squelch data, etc.
F6 SCAN will do no good since scan applies only to the first 16 modes.
(Disregard if you just went up to 16 channels)
F10 EXIT
F2 RADIO WIDE will show the total number of modes now
F10 EXIT
F3 GET/SAVE Codeplug Data
F7 SAVE Archive File
At this point, you should be able to save the new codeplug to the radio.
F8 PROGRAM Radio
After it loads, you can verify everything by going through the channels on the radio and / or reading the codeplug to see that everything is there.
Now we have a little more versatility and utility in the radio than before.
Enjoy your new radio. Just remember to use your modified RSS to make all future radio programming changes. Unmodified RSS will complain.
Acknowledgements and Credits:
I used Hex Workshop (for Windows), version 4.23, available from BPSoft at www.bpsoft.com. This is probably one of the best hex editors on the market.
MaxTrac, Radius, GM300, Spectra, PL, DPL, RSS and "Radio Service Software" (and a bunch of other things) are registered trademarks of Motorola, Inc.
Thanks to Mike Morris WA6ILQ of the Repeater-Builder web site staff for doing his input, conversion and preparation of this article.
Thanks to Robert W. Meister WA1MIK for his input and guidance on this article.
Contact:
The author may be contacted at swrwax [at] embarqmail [dot] com.
Back to the top of the page
Up one level
Back to Home
This page originally posted on Monday 01-Jun-2008
Photos and article text © Copyright 2008 by Thomas M. Mayse, KN5S
Hand-coded HTML © Copyright 2008 and date of last update by Mike Morris WA6ILQ.
This web page, this web site, the information presented in and on its pages and in these modifications and conversions is © Copyrighted 1995 and (date of last update) by Kevin Custer W3KKC and multiple originating authors. All Rights Reserved, including that of paper and web publication elsewhere.