Up two levels (Moto index)
Back to Home
on the MSF5000 Inter-Connect Board
By Robert W. Meister WA1MIK

|
Up one level (MSF index) Up two levels (Moto index) Back to Home |
Replacing the Electrolytic Capacitor on the MSF5000 Inter-Connect Board By Robert W. Meister WA1MIK |
|
The analog-plus and digital-capable MSF5000 stations have one radial-lead electrolytic capacitor on the Inter-Connect Board (ICB), located underneath the cast aluminum RF Tray. It's on the output of the 5V regulator on the board that powers the synthesizers. The older Analog (CLB) stations do NOT have this regulator; they get 5V from the control tray but there is a large axial-lead capacitor filtering the 5V power.
This board is one of the first assemblies installed in the RF Tray at the factory so you have to take some other things out to get to it. While the capacitors can be seen from the rear of the station, the ICB's solder side faces the front of the station. There are two ways to get to it; neither is easy. Method 1 involves removing the front-end assembly so you can get to the solder side of the ICB. Method 2 involves removing the entire ICB itself or at least dropping it down from the RF Tray casting so you can get to the rear of it. I actually found it equally difficult to do both methods.
On some stations they use the same style capacitor as on the analog Station Control Module: it has three leads: two on one end and one on the other, because it's so long. The single lead is also connected to ground. It's like a radial-lead cap at one end and an axial-lead cap at the other end. (There are photos of this style capacitor in my MSF Photo Tour article.) If so, you can probably replace it with a 1000uF 16V radial-lead capacitor. Best to see what's there first. One analog UHF station I opened up had an ordinary axial-lead capacitor as seen in the photo below. Click on it for a larger view.
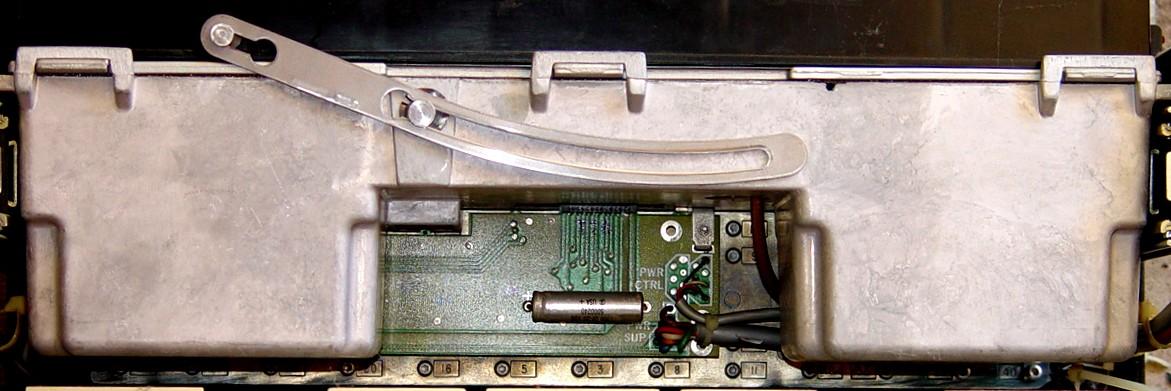
This is a lot of work for just one electrolytic capacitor. Just about any radial-lead 150uF 16V cap should work here. One such part would be Digikey part # 493-10480-1-ND and it's about the same size as the original. Axial-lead capacitors are getting rare so you have far fewer to choose from. This cap is 1000uF 12V but Digikey only has 10V and 16V in stock; a suitable 16V replacement would be Digikey part # 4024PHBK-ND. There are dozens of radial-lead 100uF 16V capacitors; choose one that will fit either vertically or lying on its side.
Common Removal Steps:
Regardless of which method you choose, you need to start with these steps. All the screws are metric thread Torx head: T10, T15, or T20.
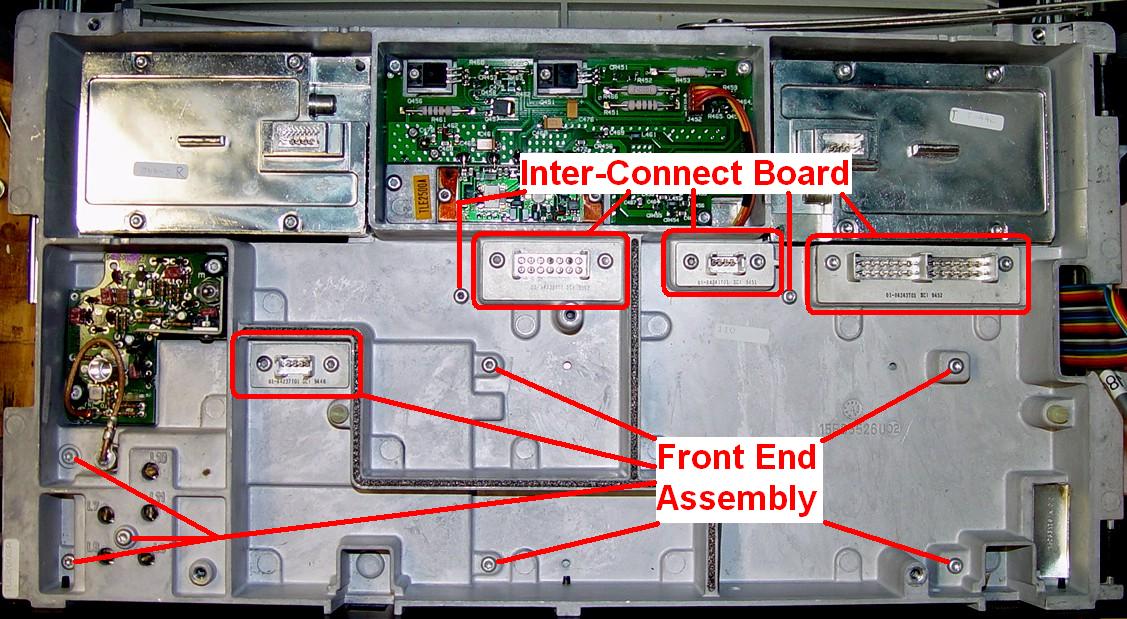
All of the mounting screws and filter assemblies can now be reached in the area of the casting revealed under the Uniboard. Refer to the photo below for the various screws and filter assemblies you'll need to remove depending on the method you choose. After the screws have been removed, the filters can be pulled up out of their respective sockets below the RF Tray casting. Click on the photo for a larger view.
You don't have to remove the filter assemblies in order to remove the front-end or ICB, but it will reduce the chance of bending the delicate pins while you're doing so. It will be much easier to reassemble the station by inserting the filters after you've reinstalled the assemblies.
Removing the Front-end Assembly (Method 1):
Removing the Inter-Connect Board (Method 2):
Working On the ICB:
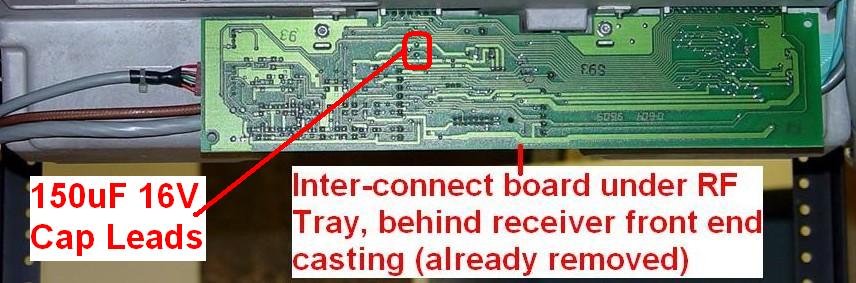
I initially tried Method 1. The front-end assembly came out quite easily although I had to manipulate it a bit to get it completely out from under the RF Tray. I then determined that it was going to be easier if I completely removed the ICB as well, so I disconnected its cables and quickly replaced the original capacitor, which measured fine. Here's a photo of the ICB from the rear of a station, showing the radial-lead capacitor you need to replace.

And here's where it's located from the front of the station (solder-side of the ICB).
Once I removed the ICB completely from the RF Tray or station, it was so much easier to work on. Here's a photo showing an ICB and the various connections that were made to it. This is NOT the same board as the one shown above. Click on it for a larger view.

Finally you get to do what you came for: unsolder and replace the capacitor. The new cap was actually a bit larger than the original cap and it fit quite well, but there's plenty of room for just about any size capacitor.
Reinstallation:
The previously removed assemblies will go right back where they came from. After you've gotten the screws started, make sure the ICB and front-end assemblies are in their correct positions and tighten the screws. Carefully insert the previously removed filter assemblies and screw those into place. Reinstall the Uniboard, button things up, and you should be good for another 20 years.
Contact Information:
The author can be contacted at (his-callsign) [ at ] comcast [ dot ] net.
Article text, photographs, and hand-coded HTML © Copyright 2015 By Robert W. Meister WA1MIK.
Up one level (MSF index)
Up two levels (Moto index)
Back to Home
This article was created 24-Aug-2015
This web page, this web site, the information presented in and on its pages and in these modifications and conversions is © Copyrighted 1995 and (date of last update) by Kevin Custer W3KKC and multiple originating authors. All Rights Reserved, including that of paper and web publication elsewhere.